Rotate Data
Introduction
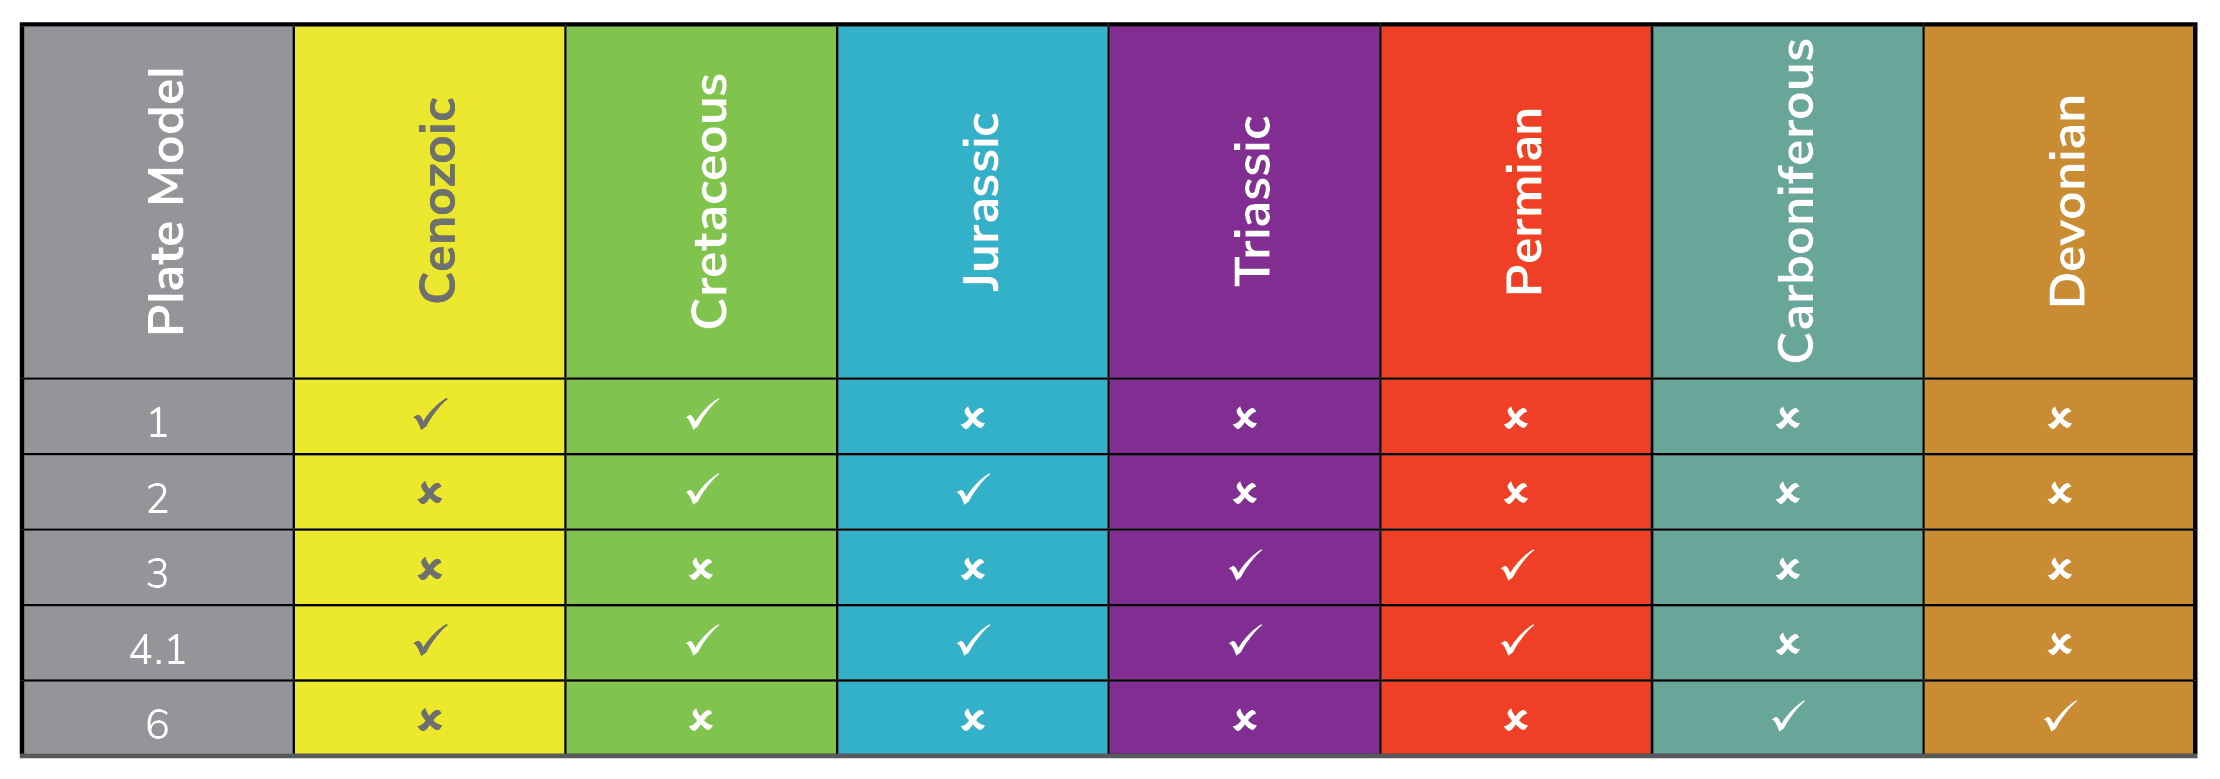
Getech has implemented a new way for clients to rotate data using Getech’s Global Plate Models via the Getech Globe Add-In. Data can be either reconstructed or unreconstructed. Reconstructing is rotating any Present Day data to the palaeo-coordinates, whereas unreconstructing is moving palaeo-data to the Present Day. Data sets that can be rotated include any polygons, polylines or points, and the versions of Getech’s plate models that can be used for rotation are 1, 2, 3, 4.1 and 6. The plate models all come with predefined timeslices and rotation ages. This information is in the appendix and can also be found using the following link: Reconstruction Ages
Most Getech layers are compiled on and are compatible with Plate Model 4.1 except for some ESM layers, and the Devonian-Carboniferous palaeogeographies and palaeosurface geology of North America. The ESM layers (derived from the HadCM3 model) are on:
- Plate Model 1 for the Cretaceous and Cenozoic
- Plate Model 2 for the Jurassic
- Plate Model 3 for the Permian and Triassic
The Devonian and Carboniferous of North America is on Plate Model 6, which is not a global plate model.
Table 1 summarises the compatibility between plate model and volumes. However, this information is also held within the metadata, and displayed next to the layer name in the ‘Find Layers’ pane.
How to Use
Click the Rotate Data button from the Getech Globe toolbar
System Requirements, Installation and Tips
The rotation tool requires a minimum of ArcGIS Pro 3.2, the minimum version of the Globe Add-In for the Data Rotation Tool is 2025.2. Please make sure you uninstall any previous versions of the Globe Add-In by going to Project>Add-In Manager and clicking on ‘Globe’ and then ‘Delete this Add-In’, close ArcGIS Pro down and then install the new Globe Add-In.
User Tips
Global or regional polygons, polylines and points can be rotated with our plate models and more than one featureclass can be rotated at a time to one or more (predefined) timeslices. Rotation processing times are variable. Using fewer featureclasses, smaller data sets, or rotating to fewer timeslices will result in shorter processing times (minutes or less). Conversely, many featureclasses, larger data sets, or rotating to many timeslices could result in an hour or more.
As previously mentioned, data can be unreconstructed or reconstructed from Present Day to any plate model. However, timeslices cannot be directly rotated from palaeo to palaeo (e.g. Aptian to Albian) regardless of the plate model. This can be achieved by unreconstructing the data first (Palaeo-position to Present Day), then reconstructing (Present Day to Palaeo-position) with the desired plate model(s).
Rasters cannot be rotated with the tool, however, this is achieved by converting the raster to a points file, rotating the points and then converting the points back to a raster. If any polygons or polylines fail to rotate, or there are erroneous or unexpected results, these can be resolved by using the following standard ArcGIS Pro inbuilt geoprocessing tools:
- Repair Geometry: the ‘Check Geometry’ geoprocessing tool can be used prior to this if desired
- Dissolve: please ensure that you do not allow multipart features
- Densify: particularly useful if features have been drawn using the ‘curve’ tools when edited.
Please note that any definition queries are not applied when using the Rotation Tool, therefore please create a subset of your data using the export function and use this data for rotation instead.
The data are partitioned prior to being rotated; this can be done in two ways. The data can be assigned to the plate which contains most of the data and are only given that Plate ID, or it can be ‘cookie cut’. The latter is where the features are split into multiple features and are assigned the Plate ID which the feature sits on. As an example, if a structure crosses over two plate terranes, for instance, Amazonia and West African Craton, but it mostly exists on Amazonia, then:
- if the data has been cookie cut, then the structure will be split at the plate boundary and reside on the respective Amazonia and West African Craton plates
- if the structure has been assigned the plate which it resides on (Amazonia) then the structure will only be rotated with that plate.
Currently, the tool only uses the ‘cookie cutting’ method, however, the addition of partitioning of data so that it is only assigned to one Plate ID are planned future updates (as will the functionality to rotate raster data sets).
Finally, if there are any issues with use of the Data Rotation Tool, and more information is required on any issues encountered, then check the ‘Show debug output’ button (described in “Accessing and Using the Rotation Tool section) and this will give more detail on the errors. If the debug does not yield helpful information, or you need further assistance, then please do get in contact with our support site using the following email: support@getech.com
Accessing and Using the Rotation Tool
Initial Set-up and Settings
The tool is accessed via the ‘Rotate Data’ button on the ‘Getech Globe’ ribbon. The tool will only work once there is an established connection with Getech Globe.
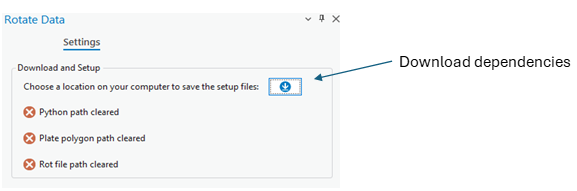
When first using the tool, there will be a prompt to ‘Download and Setup’ files that are required for the Data Rotation Tool to work correctly. Click on the ‘Download dependencies’ button in the ‘Download and Setup’ message screen and select a location to save the files. For this tool to work well it is strongly recommended that the files are downloaded on to the user’s individual computer.
Once the files are downloaded the ‘Rotate Data’ window will open. This has two tabs, ‘Rotate Data’ and ‘Settings’.
Select the ‘Settings’ tab at the top of the window, please note that if all the downloads were successful then there should be a message that reads: ‘The paths to dependencies are correct’.
If this message occurs, and there are four green ticks, then please navigate to the ‘Advanced Settings’. If not, please try re-installing, or contact our support team on the email provided above.

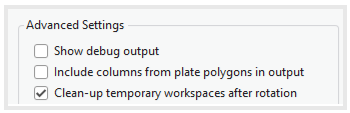
In the ‘Advanced Settings’ choose:
- ‘Show debug output’ if you would like a detailed description of all the tasks that are being performed in the background, or keep unchecked if you would like a simple version (see progress window referred to later in the document).
- The ‘Include columns from plate polygons in output’ option appends the attribution from the Plate Polygons to the rotated dataset (24 fields) if checked. It is only recommended that you do this if needed.
- The ‘Clean-up temporary workspaces after rotation’ is selected as default, this is to prevent the scratch (temporary workspace) becoming full and affecting the functionality of the tool.
Using the dropdown menu you can choose whether to add the plate model version to your output file name and if so whether to add it as a suffix or a prefix. For example, a file rotated on plate model 4.1 will have a prefix, or suffix of PM041.
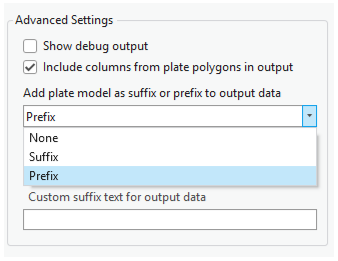
Similarly, using the dropdown menu, you can choose whether to add the timeslice to your output file name and if so whether to add it as a suffix or a prefix. For example, a file rotated to the Tithonian will have a prefix, or suffix of Tith.
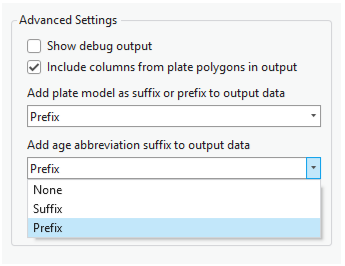
If both boxes are checked then using our example, the file will have either suffix or prefix of Tith_PM04.
There is also an option to put a custom suffix for the output data sets.

Rotating Data
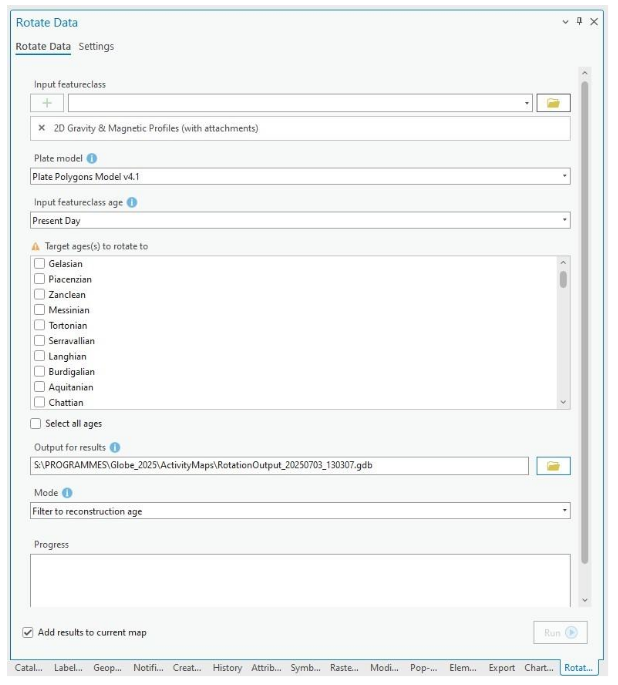
Having added the data, you want to rotate onto your map, then click on the ‘Rotate Data’ tab.
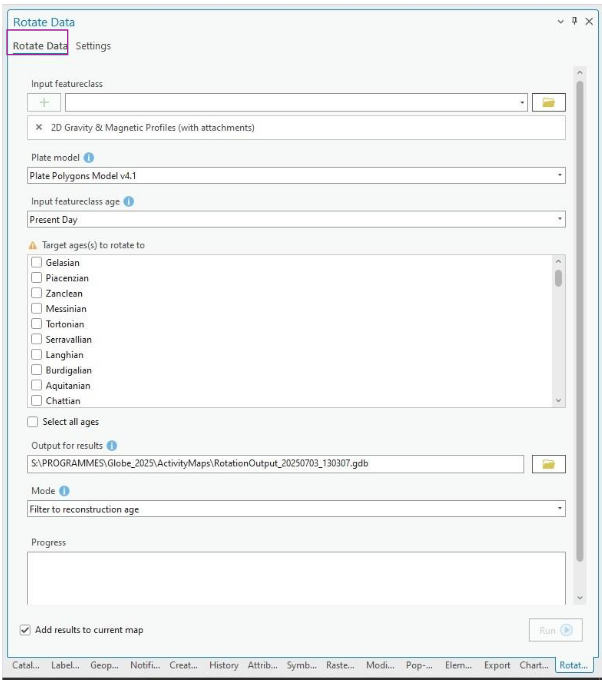
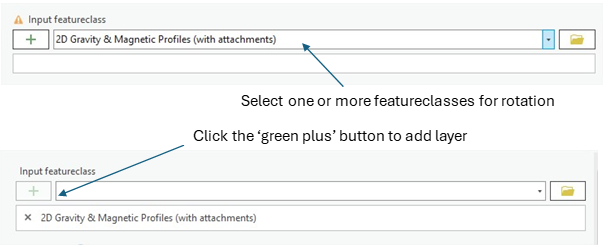
Select the data that needs rotating by using the dropdown menu. Click the ‘green plus’ button to add the layer to the ‘Input featureclass’.
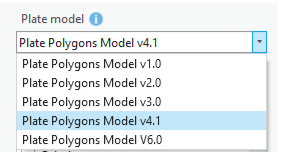
Select the plate model required using the ‘Plate Model’ drop down menu. See the Introduction Section in this document for further Plate Model compatibility information.
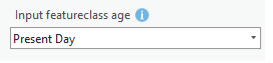
For reconstructing data (Present Day to Palaeo-coordinates), select Present Day in the ‘Input featureclass age’.
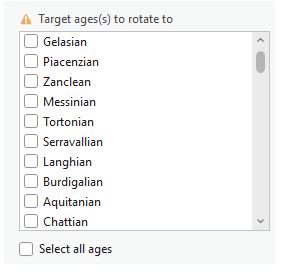
Then check any ages that the data is to be rotated to in the ‘Target age(s) to rotate to’. If the data is to be reconstructed to all timeslices check the ‘Select all ages’ found at the end of the list. Rotation age information is available in the appendix of this document or on the help website: Reconstruction Ages
For unreconstructing data (Palaeo-coordinates to Present Day), please select the (palaeo) age of the dataset in ‘Input featureclass age’. The ‘Target age(s) to rotate to’ will automatically check Present Day. Please remember that when rotating data from one plate model to another, or from one palaeo-timeslice to another, then rotations will need to go via the Present Day (i.e. Palaeo -> Present Day -> Palaeo). It is also best practice to clean the datasets (see User Tips of this document).
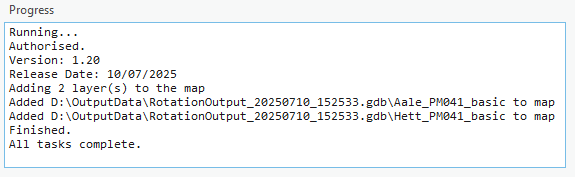
Please select an output location gdb if one has been created, otherwise, select a folder and the tool will create a gdb with the naming convention of ‘RotationOutput’, followed by a timestamp (as shown in the example below).

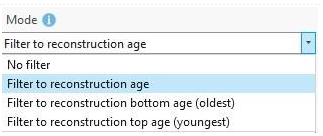
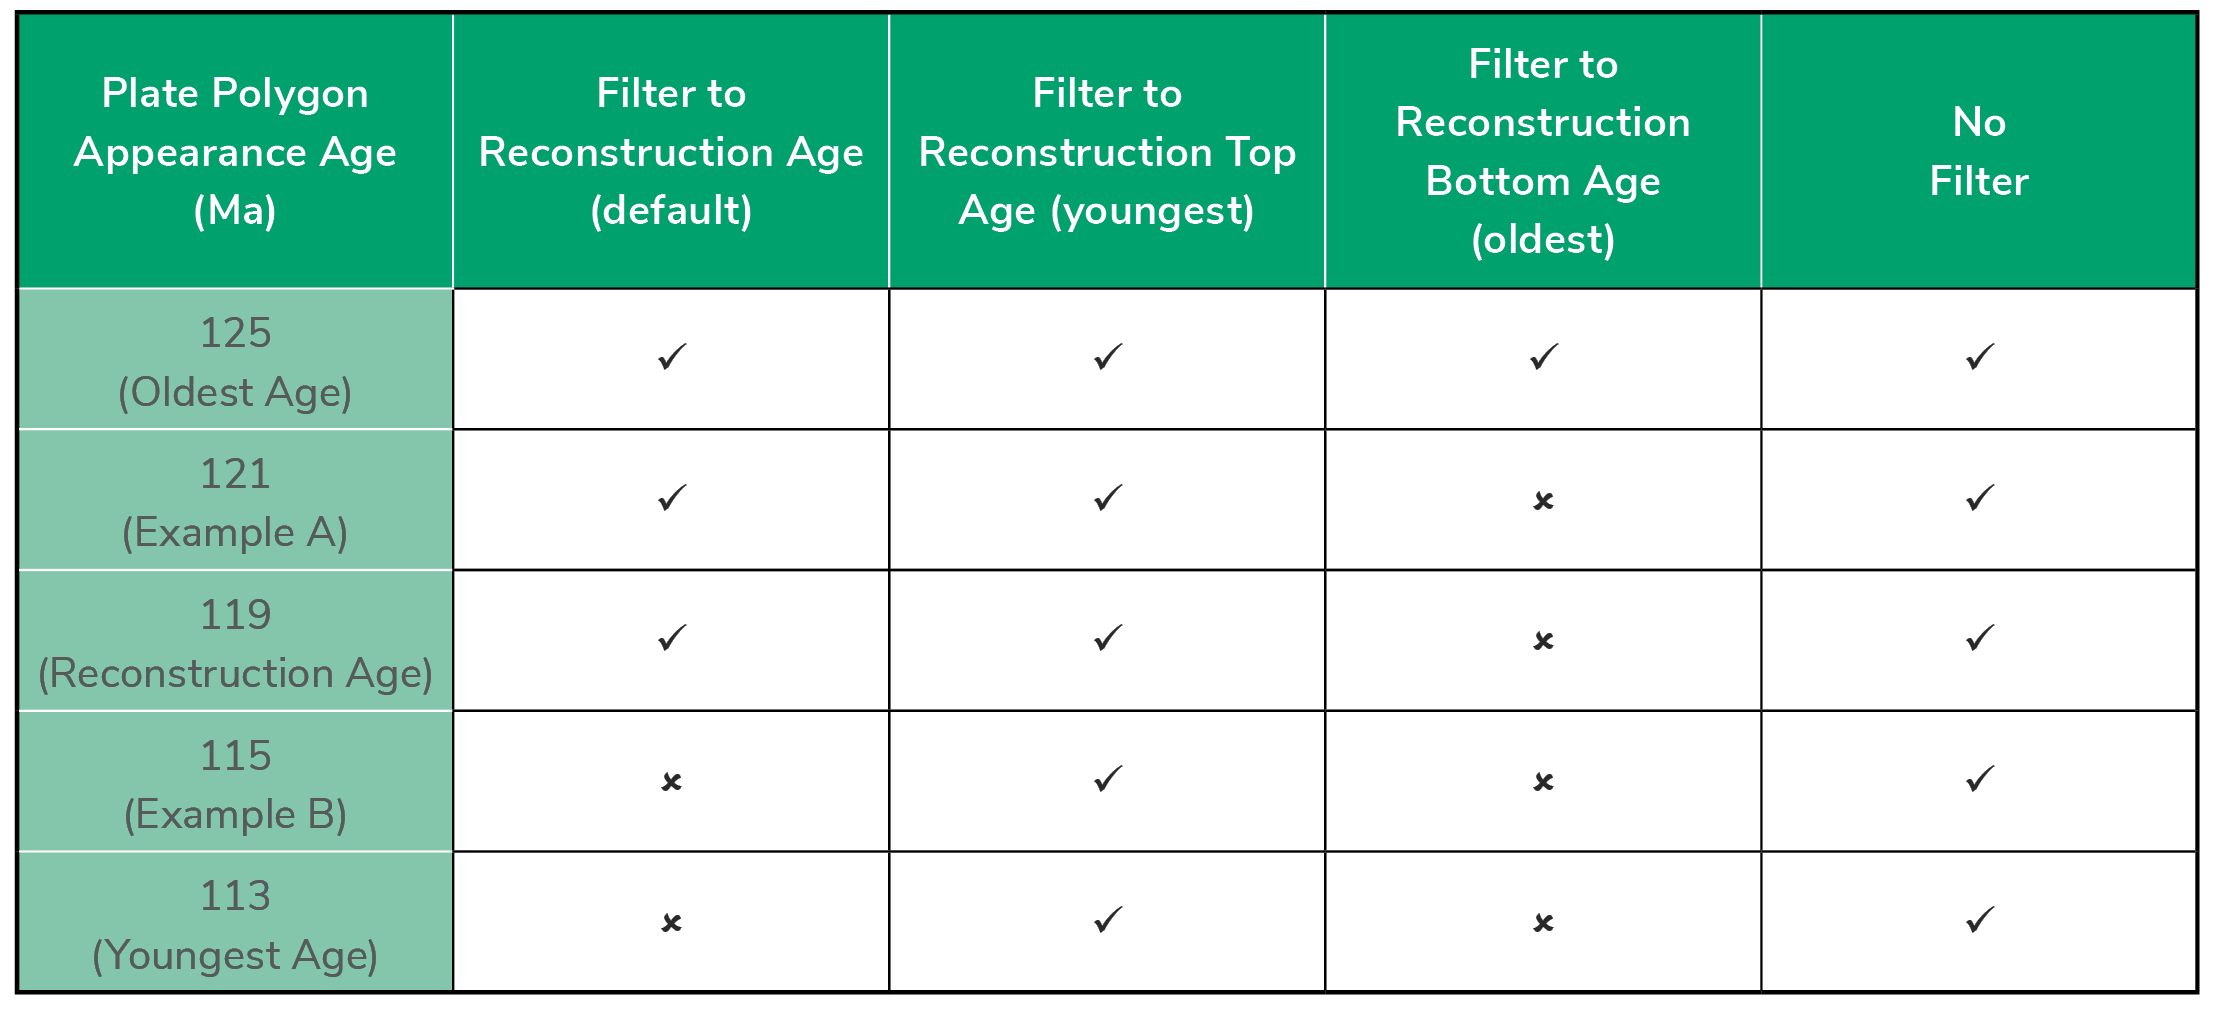
The ‘Mode’ window defines which input data are to be filtered (spatially joined) with the plate polygons. It relates to the appearance (and disappearance) age of the plate polygons and the stage to which the data are being rotated. As explained below, the default uses the reconstruction age, which is a predefined number for each time stage (this differs between plate models though).
The full options are:
- No Filter
- Filter to reconstruction age (default)
- Filter to reconstruction bottom age (oldest)
- Filter to reconstruction top age (youngest)
Mode Usage Help. Knowing the timeslice reconstruction ages, and top (youngest) and bottom (oldest) ages, may be useful when selecting the mode. As a reminder these are found in the appendix of this document and on the following help page: Reconstruction Ages
The differing modes and when they are suitable for use:
- Filter to reconstruction age This is the default setting, as it is compatible with the Getech Globe reconstructed layers. When using this mode, if the plate polygon has an appearance age which is the same as, or older than the reconstruction age, then any data which resides on that plate polygon is filtered/selected for rotation.
- Filter to reconstruction top age (youngest) This is where the plate polygon has an appearance age younger than the reconstruction age (but not younger than the reconstruction timeslice) and is useful when interested in all timeslice-related data.
- Filter to reconstruction bottom age (oldest)This is where the plate polygon has an appearance age the same, or older than the oldest age of the timeslice being reconstructed to. This mode is particularly useful when interested only in the beginning (oldest age) of a timeslice.
- No filter mode is useful when not wanting any restrictions on inter-stage selections.
Figure 2 and Table 2 summarise the differences in results when using the different ‘Modes’. The Aptian timeslice is used as an example using the Cohen et al., 2013 timescale; compatible with Getech’s Plate Model v.4.1. The reconstruction age is 119 Ma, the youngest (top) age is 113 Ma, and the oldest (bottom) age is 125 Ma. There are two ages which give examples of plate polygons appearance ages; one is younger (115 Ma) than the reconstruction age whilst the other is older (121Ma). If ‘Filter to reconstruction bottom age (oldest)’ mode is used than data which resides on either plate A or B will not be reconstructed as both appearance ages are younger than 125 Ma. If using ‘Filter to reconstruction age’ then plate A will be selected as it is older than the reconstruction age, but plate B will not as it is younger than the reconstruction age. If using ‘Filter to reconstruction top age (youngest)’ or ‘No filter’ then both plates A and B will be selected as both are older than the youngest time (113 Ma) in the Aptian.
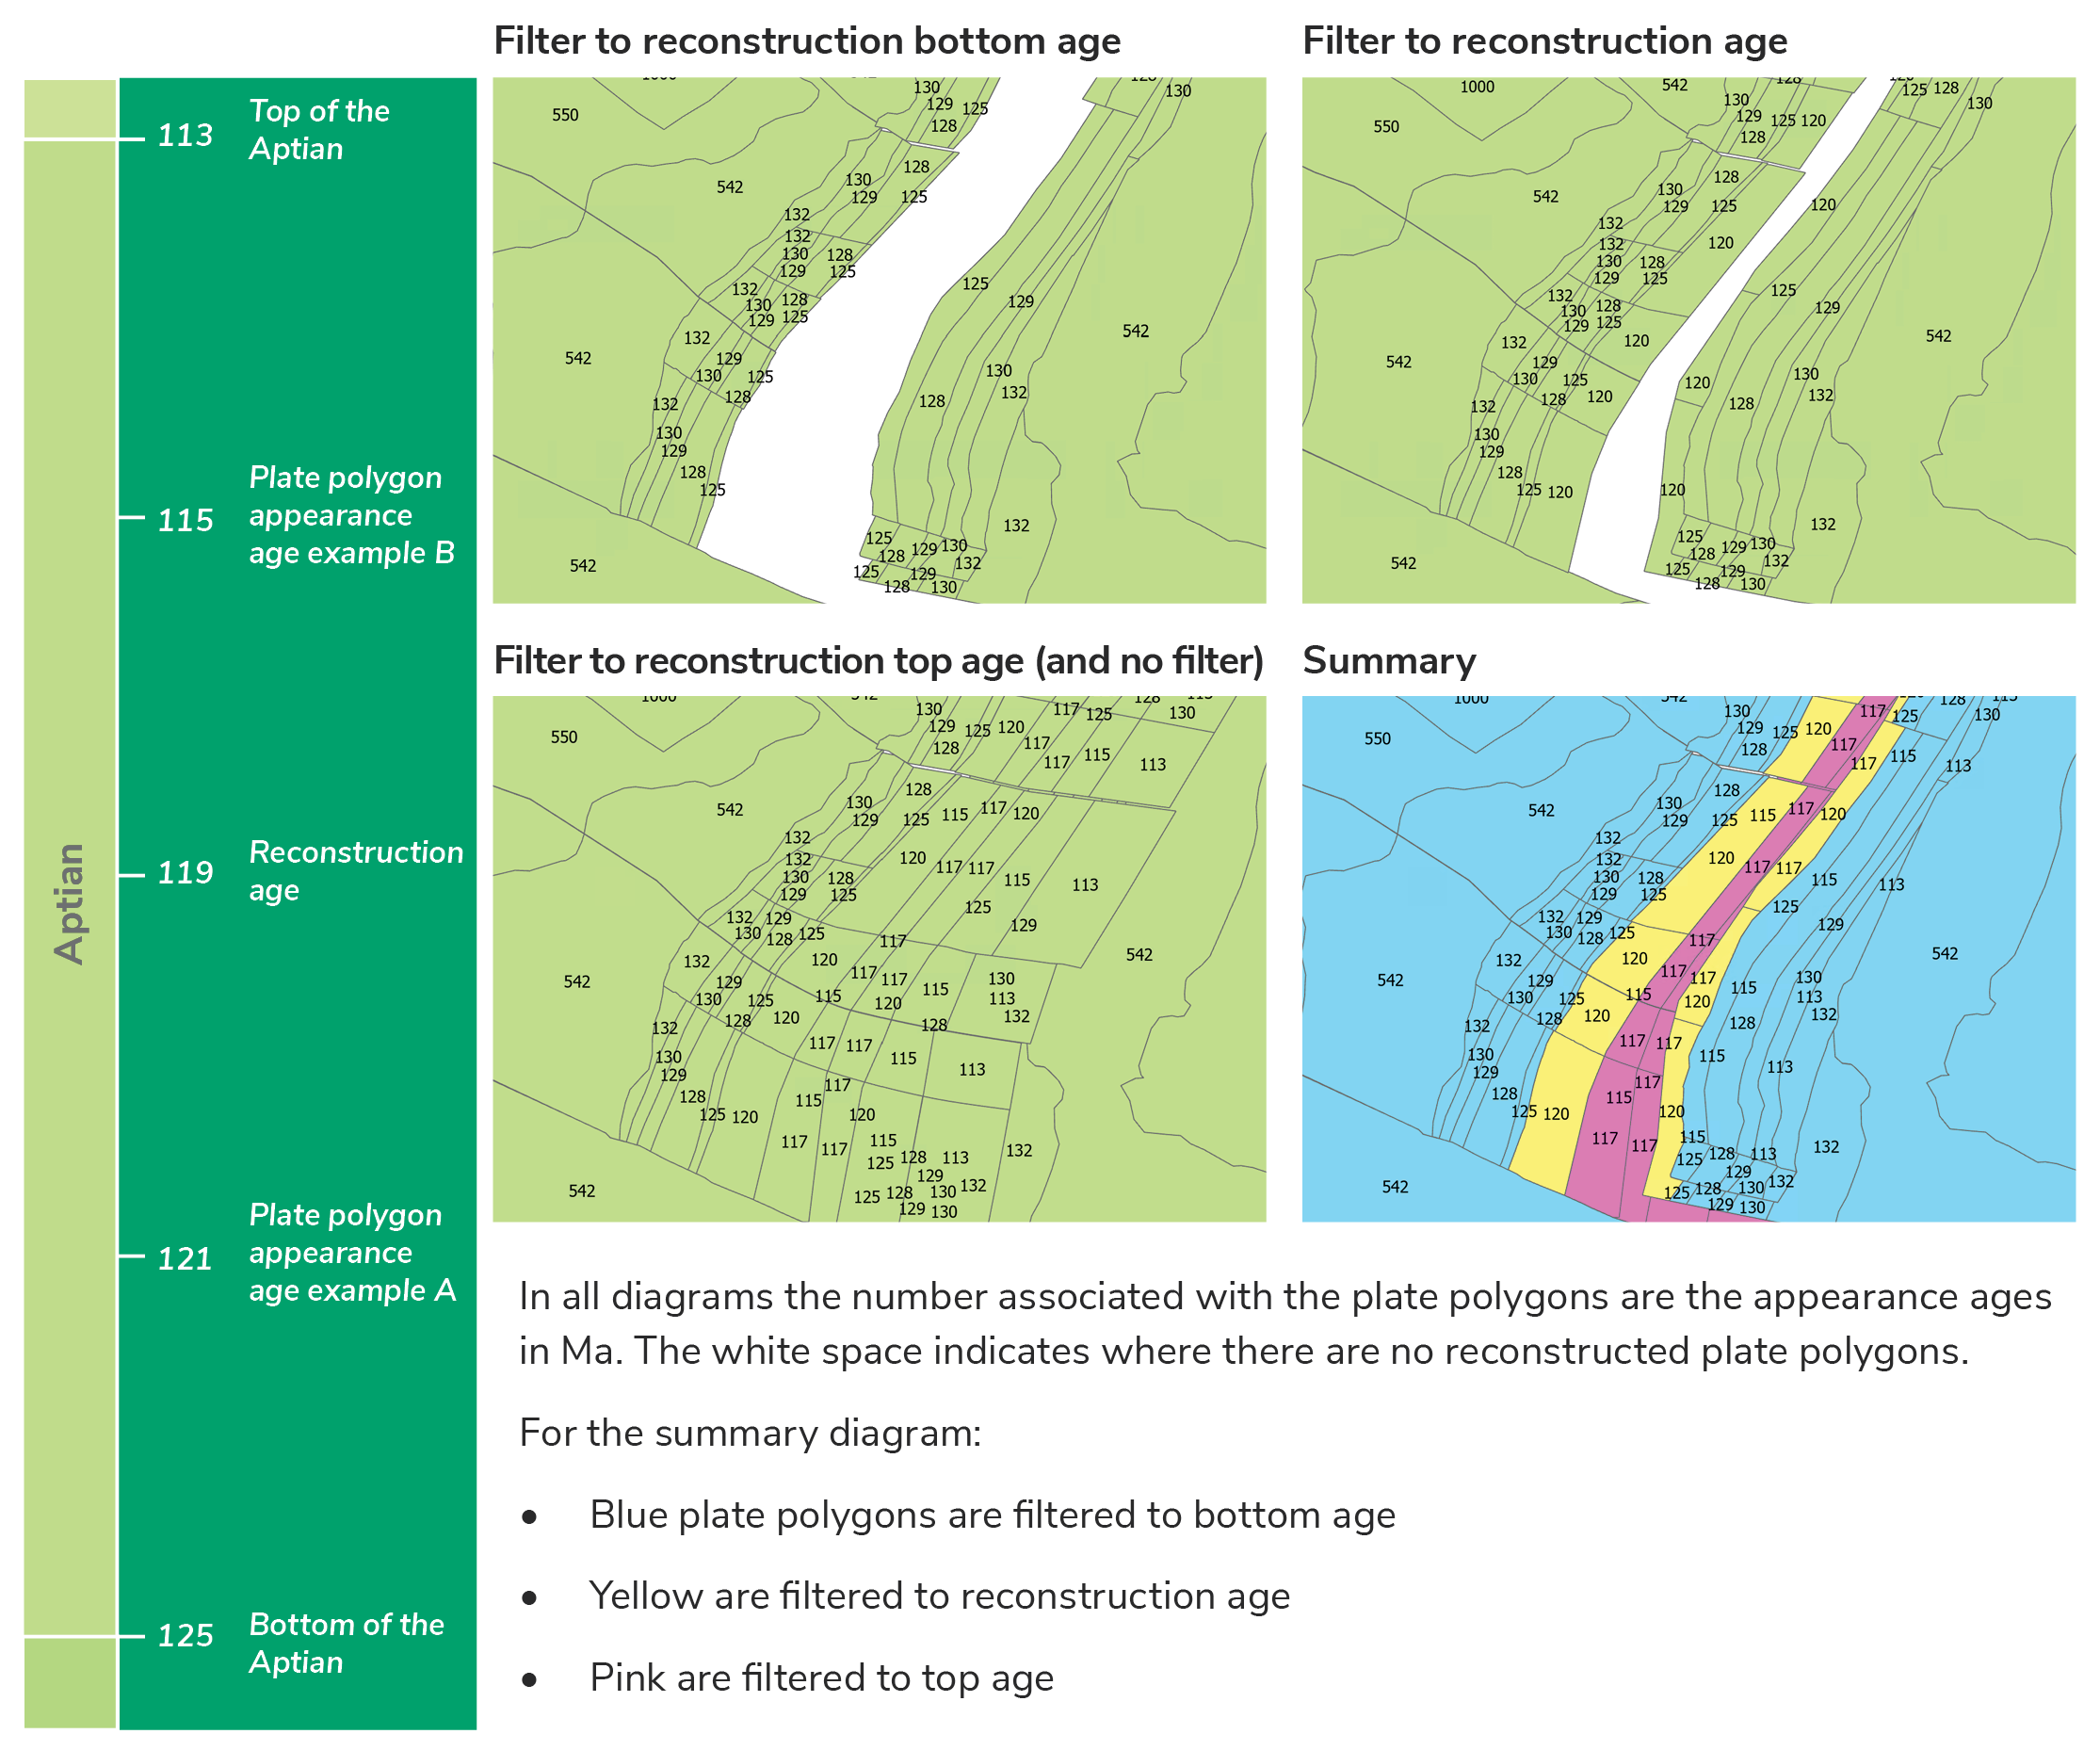
Please note that the ‘Mode’ option is not applicable when rotating to Present Day. Quite simply, if there is data which does not reside on a palaeo-plate polygon then it cannot be filtered/selected for unreconstructing.
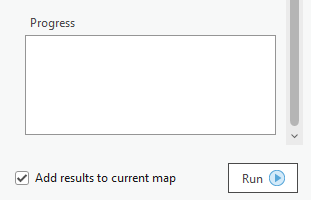
Finally, check 'Add results to current map' (if needed) and then click 'Run':
Once running, the progress of the rotation tool will be displayed in the ‘Progress’ dialogue box. This will give simple messages unless the ‘Show debug output’ was checked in the settings:
The data should have successfully rotated. If, however, there have been any issues, please troubleshoot by checking:
- if all the Getech Globe ribbon is completely greyed out, including the ‘Connected’ button please check there is an active map in the ArcGIS Pro Project
- if all the settings have been set and ‘Run’ is not available, please check that the ‘green plus’ on the ‘Input featureclass’ has been used
-
if the data has rotated but the results are not as expected, then please check that the correct settings have been used on the following:
- Plate model selection
- Input featureclass age
- Mode